An organised crafter…

… is a less stressy crafter.

Hand-decorated thread drawers

Hand-decorated thread drawers

Also, it makes the Husband happier, and I won’t find myself covered in embroidery thread when I’m halfway to the pub.
To get this beautiful chest of craft drawers, I decorated a set of blank wooden craft drawers (probably from eBay, or somewhere, I can’t remember) with acrylic paint and some sticky backed fabric (I thought it looked easy to use. It wasn’t. Next time I’ll just use paper like a normal person).
The knobs are a little bigger than the ones that came with the drawers, but they mostly broke when I tried to forcefully detach them.
I like the pattern, and I quite like the green, too.

Close up of the fabric pattern

Close up of the fabric pattern

In the spirit of organising myself, I needed a better way of organising my threads. So I downloaded this printable from Wild Olive, which is one of the most fun things I’ve seen in a while. I printed the bobbins out on thick photo paper, because I didn’t have any card, but they work just perfectly. Aren’t they the friendliest bobbins you’ve ever seen??

Wild Olive Bobbins

Wild Olive Bobbins

Itchin’ to be Stitchin’

I heart the Doctor

I heart the Doctor

I’m not sure what it was that brought me back to cross-stitching. I know I tried it out as a child and – back to that patience thing again – I couldn’t ever finish anything. I think it was seeing this pattern as I searched for all things Doctor-related that made me think I could pick it up again. WeeLittleStitches makes cross stitch cool again. And if cross-stitch is cool, then someone as cool as me should be doing it, right? (also, I have tried knitting and crocheting and I SUCK, so I needed something else to be doing at those Stich and Bitches).

Cross stitch has become, not just a hobby, but a bit of an obsession. I overheard a girl in the craft store the other day explaining that she was taking up cross stitch to give up smoking. I wish I had thought of this before I got good enough to stitch and smoke simultaneously (whilst also drinking cups of tea). Cross-stitching is all-consuming. You can lose yourself in it. On occasion I have looked up to see that it is gone midnight, and I haven’t moved for several hours.

Castle on the Hill cross stitch

Castle on the Hill cross stitch

What’s more – with wonderful software downloadable from the internet – you can cross stitch ANYTHING. The above is a pattern I created myself from a drawing by my beautiful friend Purrr. She intended it as a stain-glass style colouring print out, I put it into a cross-stitch pattern maker online, and there it was! It’s not finished in this picture, it needs some more blues and greens, but it’s getting there.

The Sunshrieks

The Sunshrieks

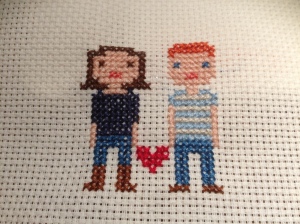
For the Husband’s birthday (which I, unforgivably, forgot about until he mentioned it 3 days before) I stitched up a little pixelpair of us. Using MacStitch, it’s easy enough to create your own designs, even if you lack any artistic talent, as I do.

I have another few that are finished, but that I can’t show publicly at the moment as they’re presents for people over the coming months. Check back here for updates, soon!

Christmas craftiness.

Since my siblings seem intent on bankrupting me by having endless numbers of children, I thought I might make Christmas presents for them all.
I lie. I also like to make them something that says I have spent time thinking about them. I’m a terrible person when it comes to remembering birthdays, keeping in touch or phoning people (I have an actual phobia of the phone, I’m sure). I can’t say for sure that they don’t look at the things I’ve made an wish I’d just gone to their Amazon wishlist, instead, but it makes me happy.
This past Christmas, I had just learnt the beauty of ModPodge (or watered down PVA glue, if you’re in the UK and financially challenged). So, I stole photos from their facebook pages, bought blank tissue-box holders, and created these:

Personalised photo tissue boxes

Personalised photo tissue boxes

They weren’t the star of the show, though. The ones that took the longest (and nearly drove me crazy) were the photo jigsaw blocks I made for the two middle nieces (LC and Bee).
The idea was simple. You know those block jigsaws that toddlers have? I’d create some of those, but using photos of the little ones.
The process was not so simple.
Firstly, wooden cubes have lots of sides. Who’d’ve thought? Secondly, your printer will never print to the size you want if you just assume it’s going to. Thirdly, putting glue on the outside of a cube and then leaving it on paper to dry will just stick the cube to the paper (duh).

Jigsaw blocks

Jigsaw blocks

The other thing I discovered, after carefully choosing the photos, cutting them to size, gluing, waiting, gluing, waiting, gluing… etc… was that these puzzles turned out UNBELIEVABLY difficult to complete. It isn’t just that there are 6 different sides to these blocks, but also that each side can be turned four different directions. If I were to make them again, I’d stick to simple, bright designs, rather than photos that all have a similar colour or pattern.

To rectify this little error, I printed out the photos I had used, for the girls to use as guides, and put the whole lot together in a funky drawstring bag.

IMG_2891

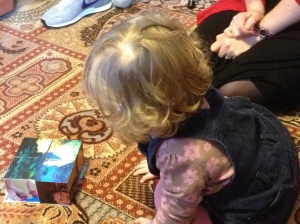
We saw Bee and her parents at the weekend, and her Mummy tells me it’s one of Bee’s favourite things. Which is nice to hear.

Bee and her puzzle

Bee and her puzzle

Kit, Chloe and Louise – Wee Wonderfuls

Doll limbs at Stitch and Bitch

Doll limbs at Stitch and Bitch

I have a group of friends who meet together ever so often to learn how to knit, or crochet, or to drink a lot. On the first such meeting, I took along all the arms, legs and torsos that needed to be sewn on. I don’t recommend sewing on legs and arms when you’ve had a few sherries. You’d be amazed how wrong you can go.

Here’s a quick walkthrough on how to make the perfect doll for your little princess.

1. Collect materials. In this case, the most important is the pattern. But fabric and thread is pretty important, too.

Basic stuffing

Basic stuffing

You’ll note the chopstick? A great trick for turning long legs the right way out after sewing them.

2. Sew your doll together and stuff it. Don’t sew it wonky (deformed dolls are less loveable, unless you watched that cartoon from the nineties…). Don’t sew it the wrong way round. Don’t sew yourself to the machine.

Naked baby

Naked baby

3. After stuffing your doll, sit back and bask in your own wonderfulness. And, give it a cuddle. Feel its chunky little head. Too cute.

IMG_2931

4. The face on the pattern is just so cute. And super-easy. Simple smile. Round, felt eyes. The only issue here, is that the stitches come out of the back side of the head. You might remedy this by sewing the face before you attach all the pieces together, but the pattern doesn’t recommend it – you might end up with a wonky face.

5. Add hair. This is my least favourite bit, and I’ll tell you for why. It’s difficult. And you need patience. Ugh. Still, this mohair yarn is the exact curliness and colour of my LL’s hair… so I had to make it work!

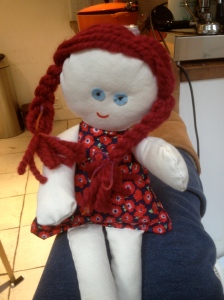
LL doll.

LL doll.

6. I mentioned in a previous post, how I didn’t know how to make clothes. The pattern really helps out, here, and I found the instructions invaluable as well as easy enough for a novice, like me, to follow. This doll has a little onesie under her dress – which is great because it masks those slightly drunken stitches around the legs and arms.

Lou Lou in her onesie

Lou Lou in her onesie

7. The dress was a little harder (thus, no photos of the process). You’ll see that I cheated round the hems, and added felt. This covered up the uneven, messy stitching – hems are fiddly at the best of times… they’re a lot harder when they’re teeny-tiny!

Lou Lou

Lou Lou

To finish her up, I made her a little handbag out of felt, and a little notebook to go inside. In the end, probably a good thing, because that’s the thing LL loved about it most, when I gave it to her on her birthday. She immediately opened up the notebook and began to scribble in it. She tells me she wrote “I love this doll”.

Which made LittleBigSis, and me, cry.

Doll making for Aunties… cont.

The first doll I ever finished

The first doll I ever finished

The first doll I ever finished looked pretty cute. Okay, so her arms were a little wonky, and I pulled her eyes a little tight. But I was feeling pretty chuffed with myself. What was missing, however, was the weight I was looking for. I wanted a chunky, heavy doll and this little thing was far from that.

I’d heard about Waldorf dolls before. Their chunky heads, and expressionless faces were originally intended for home-schooling in the Waldorf fashion. The fact that they aren’t smiling is supposed to encourage a child to exercise their imagination more. This doll can be happy, sad, angry, silly, depending on the wishes of the child. What’s great about these dolls, is that they have such fat, little heads. I like fat, little heads – as my youngest niece would tell you if she could.

I dutifully studied websites and tutorials. I bought this book on Amazon. I even went here and bought the materials I would need. But Waldorf dolls and I, it seems, weren’t meant to be. In part, this is because – again – I lack any patience. Also, I’d never used a sewing machine before and that material is pretty damn stretchy. Anyway, for all my love of the idea behind these dolls, it just wasn’t happening.

Which is when I came across WeeWonderfuls. The book is a dream – full of ideas for making dolls, and other softies. But the downloadable pattern of Kit, Chloe and Louise, (available on the website) is what really made me smile.

The pattern is simple enough, but the doll at the end is chunky, with weight, and with the cutest, fat, almost-square head. Something about this really appealed.

And so, I set to work… at one point I had 4 dolls on the go at once, almost a factory line, so that, eventually, each of my nieces might have their own doll from Aunty Sunshriek. I think, perhaps, the process needs its own post… I’m still getting the hang of inserting pictures into my text.


Doll making for Aunties

“Only the children know what they’re look for,” said the little prince. “They spend their lives on a rag doll and it becomes very important, and if it’s taken away from them, they cry…”

I’m not sure I ever had a rag doll that I loved. My teddy – a present at birth – still sleeps in my arms at night. I wonder how many modern toys would last 30-odd years of cuddles? I do know, though, that LittleBigSis has a ragdoll she has loved since childhood. To me, it is a hideous, knitted, ghastly thing. To LittleBigSis, it is her Daisy-May. Daisy-May was a present, if I remember rightly, from a speaker at a Christian Holiday Retreat we went to. I don’t know if this speaker knitted her herself, although I suspect so. Perhaps it was the unexpected gift that made Daisy-May so special. Or maybe it was something else, something about her little raggedy face.

I have four (4!?) nieces now. They are beautiful things, and it has been a fabulous year getting to know them all. LL can hold a conversation now, whilst the youngest, TH, is still just a baby (although a very smiley one). For LL’s third birthday, I wanted to make her a doll. Easy enough, I thought. But it had to be the perfect doll.

I know nothing about sewing. Technically, that’s not true, but I certainly don’t know very much. LittleBigSis was always the sewer. I just didn’t have the patience. So, I knew I was going to have to start from the beginning.

The first doll I tried, I ordered blank – pre sewn – from eBay. The seller, 9evgeniva, designed the doll herself, before sewing it together. I liked the weight, and the chunkiness of the doll, this was the sort of thing I was looking for.

Baby boiling

Baby boiling


She was a little pale, though, so I used that age-old technique of boiling her in tea. Tea actually stains and dyes a fabric really well, and is far cheaper than fabric dye. I imagine you can do similar dyes using other natural plants (nettles, maybe?). The process is, of course, a great deal easier before the doll is stuffed. This little dolly to an age to dry out, and has a funny smell about her now…

I added hair, but found, again, that it would have been easier to add the facial features before she’d been sewed together. And, when it came to dressing her, I realised that I had no idea how to make clothes. It was starting to look a lot more complicated than I had thought.

This little dolly is still unfinished. I *love* the feel of her, but she’s just a bit too tough right now.

I needed to have a rethink. The internet is full of free patterns for rag dolls. In the end, a rag doll can be as simple as you like and I found a number of examples I could give a go. A basic head, torso, arms, legs – sew them together, stuff them. Simples. One of the main things I was looking for in those early attempts, was a doll who I didn’t need to make clothes for. Some of these patterns were great for that. I learnt a lot about sewing, putting together my first rag doll, and a lot about patience. There’s something beautiful about creating something from a bunch of nothing. We should all spend time doing that.

First sewn ragdoll

The first doll I ever sewed. She’s cute, no? 


Stick a magnet on it!

Stick a magnet on it

If you haven’t seen the American show Portlandia, then I suggest you get to it immediately. It’s a series of sketches about the types of people that, allegedly, live in Portland, Oregon. In Portland, they care about the environment, they are politically aware, and they’re more than a little weird. I want to move there when I grow up.

Anyway. Portlandia has a sketch called ‘Put a Bird on it!”. I tried to find a YouTube clip to link to, but didn’t manage it. The premise: you can put a bird on anything, and it’ll make it better.

That was the inspiration for last summer’s new idea: Stick a Magnet on it! Of course, as business ideas go, it’s genius. And it’s a fun way to spend an afternoon. Whilst Stick a Magnet on it hasn’t yet got its own Etsy shop, I’d like to think the name has been trademarked and no one can now steal it. (I might do it one day, if only to prove to the Husband what a business genius I am… I think he doubts it).

The beauty of the idea, is that you can put a magnet on anything, and make it a magnet. Sounds simple, right? And yet, I haven’t been able to find one shop on the internet, whose sole marketing plan is sticking magnets on junk… so there’s a gap in the market. And people always need magnets.

Here are a few of my designs. I call them designs… I’m not quite sure that’s fair.

Scrabble magnets

The holes in scrabble tiles were made for magnets

IMG_2564

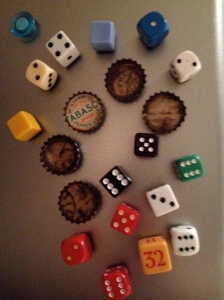
Dice are great to stick magnets to


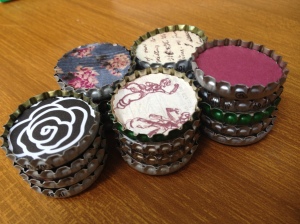
Beer cap magnets

Beer cap magnets

Someone pointed out that sticking magnets on stuff is something that anyone can do at home. All you need is magnets, junk, and glue. That’s as maybe, but I came up with the idea first, okay??


“I just don’t want to, write?”

Something happened, it seems, that stopped me blogging. It didn’t just stop me blogging, it stopped me writing altogether. I’m not sure when it happened, only that it did… and now I’m sorry.

When I first went back to work part-time after what I suppose used to be called a nervous breakdown, everyone was very pleased. What a triumph! I thought so, too. There were days (when I was at my worst) where I couldn’t leave the house without being crippled by fear and, then, there I was, back at work and managing. Not only managing, but actually enjoying it. The buzz I used to feel for teaching was back – the kids were great – and I had proved to myself that I wasn’t, actually, totally useless and a drain on society.

That was two academic years ago. For the first term, I had people looking out for me at work, and some amazing support from friends and family. And then, slowly, imperceptibly, that support went away.

This is not a bad thing, of course. I didn’t need that support anymore. Not only did I not need it, but it would have been detrimental to my recovery to rely on other people as much, then, as I had needed to before. I liken it to being a teenager, in many ways. It took me months to understand why I was desperate for people’s help one minute, and then felt suffocated by their meddling the next. (The Husband got the worst of this, for which I apologise). I digress. The fact is, I appeared ‘better’ and people left me to it.

When I first when back to work, I used my two days off to get ‘better’. I have since, of course, discovered that better is a process not a destination – but at the time, I really believed in a magical morning when I would wake up CURED. One morning a week, I saw a counsellor, and I spent the rest of the day exhausted. Emotionally and physically battered. So I slept a lot, and I watched a lot of bad TV. The other day I wasn’t at work, I spent racked with worry about work, and drowning in CBT forms to make it better. And bad TV. When I first went back to work, this was necessary. And then, it wasn’t.

I needed to fill my days with something. I needed to find myself something to do. So I went on a writing course. In fact, I went on a couple. People started asking about my writing and I, full of excitement about my new hobby, wanted to talk about it. The feedback I got from these courses was positive. I began to feel like being a writer  was something I could actually do. And that’s where it went wrong. The minute I began to believe that this was something I could do, I was plagued with all those old thoughts about why I couldn’t. All the little voices that mocked me for even believing it was possible. The manuscript I had worked on for so many months, is still unfinished. Opening the file makes me feel physically sick.

And people kept asking about it.

This weekend, my Dad, trying to make conversation where we have something in common, asked how the writing was going. I couldn’t answer. I choked. The thing is, it isn’t going. I’m not writing at all. Not only am I not writing, I don’t even think I want to write. Writing is stupid. If I’m not going to be Margaret Atwood, Doris Lessing… Kafka – for God’s Sake – then I don’t want to write at all.

So I spend my days off – since you asked – doing absolutely nothing but make myself miserable and watch bad TV and I HATE EVERY MINUTE OF IT. Which is not something to say to your friends, or colleagues, who all have to work full-time like normal people. I am wasting the gift I have been given – the gift of freedom from full-time work – and I feel guilty for it. And the guilt paralyses me, and eats away at all the hard work I did in recovering.

I am still a very long way from being ‘better’. I need to remind myself, again, of that poem that so resonated with me: “You do not have to be good”. When I take my eye off the ball, I am still likely to slip back into unhealthy ways of thinking (and of course! I thought like that for 30 years, it isn’t going to go away so easily). I need to write for fun, not for any other reason. I need to give myself the freedom to just enjoy stuff, without needing to prove myself. I need to be better at telling people, when they ask, “actually, I’m part-time because I believe that there should be more to life than work… I’m just still working out what that means”.


Relocation Relocation – Cavy style

The girlsI’m not the world’s most natural pet owner. I’ll confess (though someone who loves animals more than I do, might get upset) that I got our little guinea pigs as part of my recovery. It felt important to have something to wake up for in the morning, and something to give me some routine. To that end, they have been marvellous – no matter how awful I feel, I have always managed to pull myself out of bed, or off the sofa to give them what they’re squeaking for.

Guinea pigs are shy, though, and I have learned a lesson in that, too. They love me as much as any pet loves its owner (I am the bringer of greenery!) but they don’t need me – not me, personally – and that ‘rejection’ has helped me a great deal, too. An illustration for life, and all the relationships I have. I have a lot of people that love me, but I will never find someone who just can’t live without me (though God Knows I’ve tried over the years) because that just isn’t healthy, or sane. Guinea pigs taught me that. (I hear most people learn it some other, normal, way – but there you go).

One thing I can do for my little friends, though, is give them a home that they will love. Their cage has evolved a lot over the last year – within months it looks dingy and chewed up, so we go back to the drawing board and revise it. For a while they had a mansion, all carpeted and wall-papered. I liked it, but it was a bugger to clean.

Piggy mansionNot only that, but they loved to chew the walls. And, eventually, they never left that little section underneath the second floor, except to eat…

The amount of space this baby took up in our tiny little second bedroom, started to seem a little silly – and Spring is all about simplifying, so I redesigned (and roped the Husband into doing some manual labour).

Husband Slavery

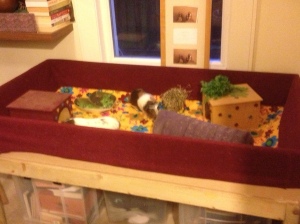
It’s a simply, one storey wooden design, that frees up more space in our room, without the pigs losing too much running room. They still come out and run around regularly, so the ‘cage’ only needs to be big enough for the rest of the time. Some of my friends were a little worried that Frida and Audrey might jump over the sides. To them, I said “Yeah, you don’t know my girls… they’re not going to do any jumping”. Frida still stands on her back legs and pokes her head over the side when she hears the fridge door, but otherwise, they’re quite incapable of getting that high. IMG_3091

Only a few things need to be done, now. You’ll see there’s no water bottle in the picture. Taking away the cage walls, means we’ll have to rethink how to hold up their water bottle. For now, we’ve rigged it up to an old cube grid, but it looks pretty dire. Any ideas would be gratefully received!